Showing posts with label dollar store. Show all posts

Thursday, February 21, 2013

Polish Stand Tutorial

I know that it has taken me forever to get this posted. I first showed a picture in this post Handmade Polish Stands and it looks like this:


 I love these stands and I made them to fit on top of my melmers. You can change the sizes to fit where ever you want to put them. I have 2 that I've had since my original post back in October, and they are filled. They have shown no signs of weakening or anything. So these are very sturdy.

Alright here we go:

I started with a foam board that I bought at the Dollar Store and I used hot glue to secure everything. Here are the pieces and their measurements that you need to cut.

For the 2 main pieces which I cut out first were the back side and the base. You can make these any size you wish and pretty much the only thing you have to change is the length of the shelf pieces shown below.


I found that adding edges to the sides help to keep the bottles from sliding over the edge. Gotta protect those  bottles. :)

 To start putting everything together I start with gluing the shelf pieces together. You have to make sure that you put them all together the same way otherwise things won't line up correctly. Make sure that the side shelf piece it laid on top of the top shelf piece, here is a close up of what I mean

 Make sure that all the shelves are put together the same way. After gluing each piece together and pressing them together with a little pressure, I like to add another layer of the glue and I run my finger over it to kinda spread it out. Don't worry you won't burn your finger it will just stick a little harden. I find it fun to peel it off lol.

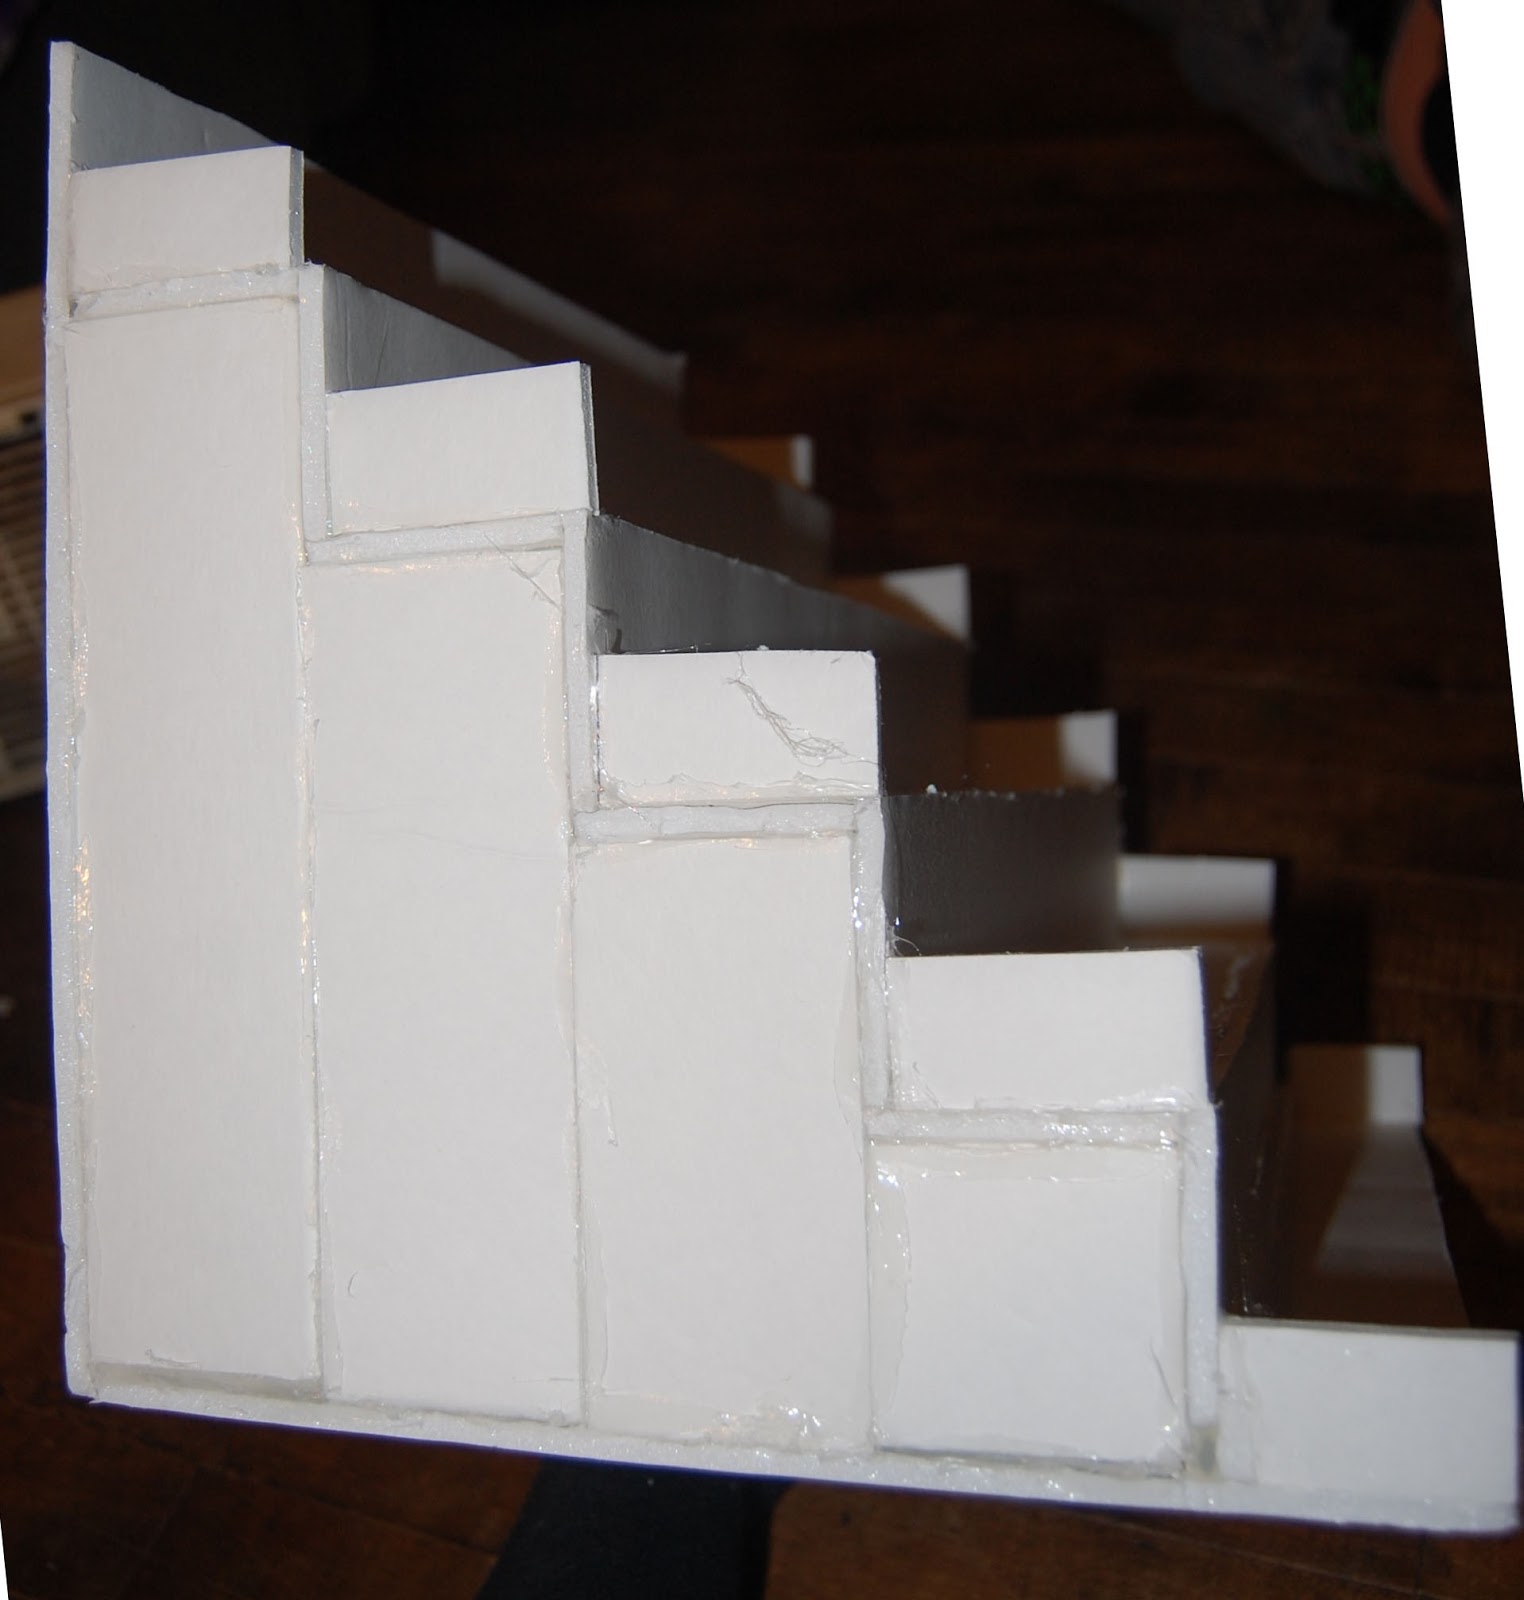
 Once you have all the shelves then you have to glue them all together and you will get something that looks like the above. When you glue them together, make sure that they are all sitting the same way and that you glue them together with the side piece on top of the top of the shelf below it. You will get what looks like a staircase.

 Next you will glue on the side pieces. I find it easier to start with the bottom shelf and then work your way up. If you wanted to make this one solid piece I'm sure you could do that, but I just found it to line up better and make gluing easier since hot glue hardens somewhat quickly. 

Option: I didn't take a picture of this but I added a piece on the under side of the stair part to create a little more support and to also push the side out since they do pull towards each other a little. Plus this makes lining up the base and back piece with the stairs.

I then glue the staircase to the bottom base .To do this just line up the back edge with the back sides of the stairs, that creates the bottom shelf. 

The second to the last step is to attach the back piece, this attaches everything together and creates the back of the top shelf.
 The very last thing to attach is the edges to keep the bottles from sliding off the sides. I also ran a couple lines of hot glue over the shelves and smoothed them with my finger. I did this so the bottles would have something to kinda stick to and not slide of the front of the shelves. Another option it to add some grippy shelf liner to keep the bottles from moving. Once this is done you can pretty much do what ever you want to decorate them.

You know have your own homemade nail polish stand and it really only costs about $2.00 (maybe a little more if you don't already have a hot glue gun, and if you want to buy something to dress it up.)

There you have it. If you have any questions about this tutorial please feel free to ask. I will answer them, just leave it in the comments section below. I hope this makes sense. If you make a stand using this tutorial please feel free to share pictures, or links to blog posts, in the comments section.

Thanks for reading! Have fun!

Thursday, April 19, 2012

You Better Catch Up!!! Days 16, 17, and 18

Warning: This is a long post with lots of pictures!!!

I'm a bad, bad, bad, blogger :( I've been slacking on the posting for the 90 Day Challenge. I've had a lot going on, but you didn't come here to hear me whine lol, so I'm just going to get on to the pretties you really came to see :)
Day 16 of the 90 Day Challenge
So first up is a polish I got in my recent swap, Models Own "Tropical Sun" one of the newly released polishes. It's a little on the sheer side so I used 3 coats. Next time I think I'll use some underwear :)
 I love the color. It's an orange with a golden shimmer to it. I planning on playing with some layering soon. I love to play with polish!


 I didn't notice the little bubbles on a few of the nails until I looked at these pictures lol, it wasn't really that noticeable on the nail though.
I'm very happy with this polish and I'd love to get the other two that were recently released at the same time as "Tropical Sun"
-------------------------------------------------------------------------------------------------------------------------

Day 17 of the 90 Day Challenge

Yesterday I went to the Dollar Store to find a small glass dish for water marbling... I went in for 1 thing and came out after spending $13.00 lol... Here are the nail related items:


 These polishes are so pretty and 2 for a $1 so they are 50 cents each!!! Awesome dea1! These two are "Midnight Sky" and "Teal-y Cool"
 These two are "Lavender Envy" and "Twinkle, Twinkle"
 These I saw and had to get them. I figured that if they don't work for franking then I can still use them for nail art. I have a few being tested right now to see how they hold up in polish.

The top ones are bar glitter and various shapes, the bottom row are glitter, bullion beads, and iridescent glitter. There was a 6th one but it was the crushed shells and I had no interest in them so I didn't get them. I'm thinking about go to pick up a few more for my next giveaway. Let me know if you want more pictures of these.

After that stop I went to Sally Beauty Supply for their buy 2 get 1 sale on the polishes. This is what I brought home:
L to R: Pink Voltage (neon), Celtic Sun (neon), and Into the Limelight (neon)
 Since summer is around the corner and the weather is kinda warming up, I decided that I needed some nice neons in my collection. 

 L to R: Burnt Orange, Molten Gold, Molten Copper, Purple Pizzazz
I just liked these ones :)

I also received nail mail from an ebay auction that I won.
 L to R: Icing Radio Super Star, Party Hardy, Glamourous, Lemon Cello On The Rocks
I got them for a great price, cheaper then if I had bought them in the store, even with shipping so Yay! Win for me!
I did try out "Radio Super Star" the blue and purple glitter were pretty, the starts on the other hand were a PITA, but if you can get them on your nails they do lay flat.

------------------------------------------------------------------------------------------------------------------------

Day 18 of the 90 Day Challenge
My first go at water marbling!!

So really it isn't my first go at it, but it was my first attempt that actually made it on my nails lol. I was having so may issues, but after I tried a glass dish it worked out a lot better. I was trying to get something similar to this:
This was done by Colette from My Simple Little Pleasures. How awesome looking is that? I love it. I tried to use similar colors since I didn't have the exact same ones. I used:
China Glaze - "Riveting", "Harvest Moon" "Smoke and Ashes" and Spoiled - "Pick Your Poison"

Mine didn't come out even close but I'm still proud of it :)
 Left Hand, the 2 darker nails are the first ones I dipped, so not that great, and you can't see the "bubbles" in person either
I love how my thumbs turned u, I just wish it hadn't gotten smudged :(
I got a bit better on the second hand. I dipped all 4 fingers in at the same times since it was getting late and I was getting tired. I should have used more black and red.
I do like how this thumb came out too. None of my nails really looked like flames so it was kinda a fail, but you can't get better at something if you don't practice. So I know what I'm going to be doing this weekend :)

Well that's it for now. I'm not current on the 90 Day Challenge. Don't forget to check out the other ladies participating in the challenge as well:

 
Only 26 followers needed until my next giveaway!!!

Friday, December 2, 2011

My awesome Dollar Store Find!!!

I went to the Dollar Store today during lunch because I needed to get some cookies :) As always I like to look around and see what they have. Well I was walking down an aisle and just happened to look down at a box on the floor and noticed the little packages looked fimiliar, so I took a closer look....

It was a box of Sally Hansen Color Quick Chrome polish pens!!!! I've heard these are great for stamping but I never wanted to spend the $7-$8 they are always priced. For $1 each I couldn't pass it up so I grabbed a few. I think I got at least one of each color and then a double of ones I figured I use more. This is what I picked up:

These were the only colors they had. I'm going to check the one by my house after work.

Has anyone else been able to find these at the dollar store? Are you going to try and look for them? Please leave any questions/comments below, and thanks for reading my blog! :)